USB drives are incredibly useful for transferring files, storing backups, or running portable apps. But, one common issue many users may face is slow USB drive performance. Lucky, there’s a simple method to speed up your USB drive and boost its efficiency by tweaking a few settings on your PC. This lifehack can make a significant difference, especially when transferring large files.
In this article, we’ll walk you through the process of optimizing your USB drive for faster performance using the built-in settings in Windows. By enabling record caching and optimizing performance, you can ensure your USB drive operates at its best. Let’s dive into the steps.
Why USB Drives Can Be Slow
Before we get into the solution, it’s important to understand why USB drives can sometimes be slow. USB drives often default to the “Quick Removal” policy, which prioritizes safe removal without needing to eject the device manually. While this makes the USB drive more convenient to use, it can slow down its read/write performance because caching is disabled.
To improve the speed of this, you can switch to the “Better Performance” setting, which enables caching and allows the drive to write data more efficiently than the previous mode. This, along with enabling Record Caching, can significantly improve performance.
How to Speed Up Your USB Drive: Step-by-Step Guide
Follow these simple steps to speed up your USB drive:

- Connect Your Usb Drive
First, plug your USB drive into your computer. Make sure your device is recognized by Windows system .Then,You can check this by opening File Explorer and locating your USB drive in the list of connected devices.
- Open Device Properties
Once the USB drive is connected, open File Explorer by pressing Windows + E or by clicking the folder icon in your taskbar.
Right-click on your USB drive and select Properties from the context menu.
- Access Hardware Settings
In the Properties window, click on the Hardware tab.
You’ll see a list of connected hardware devices. Find your USB drive in the list, select it, and then click on the Properties button at the bottom of the window.
- Change Device Settings
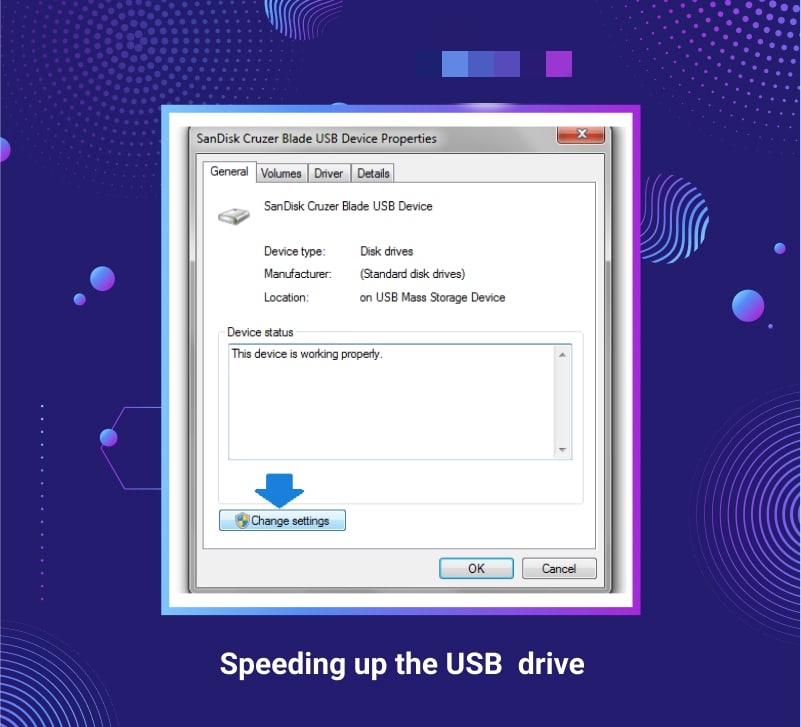
In the next window, click on the Change settings button. This will allow you to modify the performance settings of your USB drive.
After clicking, a new window will appear with more tabs.
- Optimize For Better Performance
In the newly opened window, go to the Policies tab.
Under the Removal Policy section, you’ll see two options:
Quick Removal (Default): Disables write caching on the device, allowing you to remove the device without using the “Safely Remove Hardware” option.
Better Performance: Enables write caching but requires you to use the “Safely Remove Hardware” option before unplugging the device.
Select the Better Performance option.
- Enable Write Caching
Under the Write-Caching Policy section, you’ll see a checkbox that says “Enable write caching on the device”. Check this box to allow record caching, which enhances the performance of your USB drive.
Click OK to save the changes.
- Safely Remove Your Usb Drive
Once you have enabled these settings, it’s important to always use the “Safely Remove Hardware” option before unplugging your USB drive. Failing to do so could result in data loss because of the caching mechanism. To safely remove your USB, click on the USB icon in the taskbar, and select “Eject” before unplugging.
Why Does This Work?
When you switch to “Better Performance” and enable write caching, your USB drive can store data temporarily in the cache before writing it to the device. This allows your USB drive to handle large amounts of data more efficiently, reducing the time it takes to transfer files.
Write caching improves the drive’s performance by allowing it to collect and process multiple write commands at once. But, the trade-off is that you need to properly eject the device using the Safely Remove Hardware feature to avoid corrupting any cached data.
Tips for Maintaining USB Drive Performance
Now that you’ve optimized your USB drive for better performance, here are a few additional tips to maintain its speed:
Keep Your Usb Drive Clean: Regularly remove unnecessary files to ensure your drive isn’t overloaded with data.
Use The lastest Usb Ports: If possible, use USB 3.0 or USB 3.1 ports for faster transfer speeds compared to older USB 2.0 ports.
Regularly Check For Errors: Periodically run the built-in Error Checking tool in Windows (right-click on the USB drive, select Properties, and go to the Tools tab) to ensure there are no issues with the drive.
Format Properly: Ensure your USB drive is formatted with the right file system. NTFS is ideal for larger files, while exFAT is suitable for cross-platform compatibility.
Summary: Enjoy Faster USB Transfer Speeds
By following the steps outlined in this guide, you can easily boost the speed and performance of your USB drive. Optimizing your device for better performance and enabling write caching ensures smoother and faster data transfers, particularly when dealing with large files or frequent read/write operations.
This simple tweak can make a significant difference, improving your workflow and saving you time. Just remember to safely eject your device each time you’re done to protect your data.
Take control of your USB drive’s performance today by applying this easy fix, and enjoy faster file transfers and smoother device usage!


